Tiffany Doodles Digital Stamps: Favorite Fan of the Week!:
Beth Devitt
http://bethdevit.blogspot.com
Thursday, March 3, 2011

Saturday, February 12, 2011
FLOWER CHALLENGE CARDS
I created two cards for the Creative Classroom Copic Challenge No. 11 color flowers. Here are the two entries that I posted.
 On this card I used Hero Arts stamps, that I have had in my collection for several years. I am real pleased with the end result.
 This digi stamp image is from Tiffany Doodles. It is called Dogwoods. It made into a beautiful card. Thanks Tiffany.


Friday, February 11, 2011
ANN'S VALENTINE CARD
I just had to have these stamps from the new Magnolia line called Your So Special, this is the Romantic Window and Tilda with Heart stamps. I colored them with Copics. I cut out Tilda and placed her on top of the window with pop dots, added a "Hugs" tag and a ribbon. Isn't she cute! I hope she brings a smile to my friends face and warms her heart.


VALENTINE GIFT PROJECTS
I did two projects this year for Valentine's Day. One is primarily for my kids in Children's Choir. I made 26 of these. They resemble the bags I made for Christmas. Not too difficult to complete and the chocolate was a big hit with the kids. I used The Stamps of Life set Hearts2Love, and one my new favorite punches from Martha Stewart, it's so cute.
 The second project is for my hubby and my daughter and her boy-friend Michael. I saw this project on Split Coast Stampers site and thought it would be fun to create. They are pouches that hold a candy bar, when you pull the ribbon up on the top the candy pops out. Love it.
 Here is a close up of the heart detail on my hubbies.
 It was a quick and fun project. Hope they enjoy them.


MOM'S VALENTINE
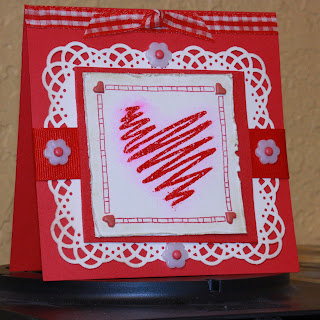
I made two of these cards actually, for both my mom and my mother-in-law. The center heart is from The Stamps of Life, Love2Hug set. I stamped it then used embossing powder to give it extra punch. A little sweep of pink over the top to complete the heart. Four heart brads around the corners. All set on a cream piece of paper punched with Martha Stewart punch around the page. Finish with cute flower buttons and ribbon. Hope both they like them. Happy Valentine's Day Moms.....

Monday, February 7, 2011
LOVE IS IN THE AIR
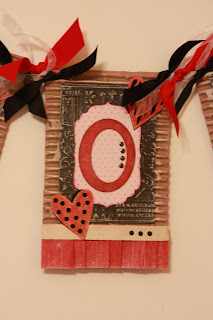
I am very happy with the way this LOVE banner came together. I saw the idea on line and it is pretty much a copy, but you know how that goes. Can't ever match things up identically.
 It uses corrugated cardboard as the base, with embossed black matt and embossed light pink Spellbinders labels 4. Letters are cut using Alphalicious cartridge then embellished with brads and hearts cut with my Sizzix dies. A folded paper ruffle at the bottom with a ribbon boarder and finish with ribbons along the top.
Lovin' it. Here is a close up of the each letter.



Thanks for lookin'. Have a great Valentine's Day. More projects to come.

Lovin' it. Here is a close up of the each letter.


Thanks for lookin'. Have a great Valentine's Day. More projects to come.
Sunday, January 23, 2011
PORTLAND HEAD LIGHT
This is a scrapbook page that I just completed. I scraplifted the entire layout from the cover of the autumn/winter 2010 CTMH catolog. I loved this layout from the moment I saw it. The dp is Magnifique. I didn't have all the identical embellies but let's face it, we all have enough to substitute something from our stash. The results are nothing short of magnificent.
 Well it may be a great layout and the papers are beautiful. But look at that lighthouse, it is one fantastic photo. I took it in October, while visiting Ivy in Portland, Maine. It was a perfect day.

KATHY'S 16TH B-DAY
My niece Kathy turned 16 on the 21st of January, that's an important birthday. I was going for a card that would appeal to a hip teenager. I used purples and blues and the Happy Birthday tag is metal. The dp is from CTMH Magnifique. I'm certain one part of the card made a hit...the inside money envelop, that'll get 'em very time.
 Hope your birthday was awesome Kathy! Love ya.

CAGLE'S WEDDING CARD
Cleat Cagle married Bonnie on January 15th. That is one of Mark and My's anniversaries, we were married on the 14th but our 1st date was on the 15th of January. It's a good date to get married on. I made this card for them. Bonnie's favorite color is yellow, so yellow roses fit the bill. Cleat & Bonnie...hope you have many wonderful years together.
 The image is color with Copic Markers. I used a Spellbinders die to cut out and embose the scalloped oval shape. The lacey paper is done with a Martha Stewart punch. My dp is from DCWV Linen Closet stack.

Wednesday, January 5, 2011
NEW YEAR'S GIVE AWAY
This creation was somewhat random. I purchased the cute measuring spoons at Joann's. They are somewhat unusual they are: a Dash, Pinch, Smidge and Nip. I thought I'd add them to Christmas gifts. Like, if I put together some ingredients for cookies or something. Well needless to say no time for that project so, I'm thinking... aw I wish I had a way to gift these to people so they don't go to waste. Well that's when the light bulb goes on and I dreamed up the New Year's Recipe.
 Well that's a bummer, the one I took a photo of has the recipe wrong. It's suppose to read:
Dash of Prayer - Pinch of Love - Smidge of Laughter and a - Nip of Luck. Oh well, the holiday's can get a little rushed right.

Dash of Prayer - Pinch of Love - Smidge of Laughter and a - Nip of Luck. Oh well, the holiday's can get a little rushed right.
SNOWMAN SOUP
OK well all the credit for this project needs to go to Stephanie over at the Stamps of Life. I loved her idea and totally hijacked it. Snowman Soup is basically a very fancy hot chocolate mix. Which I don't think a snowman would want to partake of at all. Let's say, it's for the maker's of snowmen, after they come in out of the cold. It's consists of: hot chocolate mix, big marshmallows, candy canes and Ghirardelli Peppermint Bark. I heard from Heather that, it's the best hot chocolate she's ever had (thank you). Well you combine them all into a baggie and add a decorated bag topper. I used stamps from the Stamps of Life Joy2Christmas set and an old font set from my stash.
 Then I added a little poem to give it that extra amount of cheer. You can see the poem from the back of the bag.
 It's a little difficult to read through the bag...it says...


When the weather outside is frightful,
Snowman soup can be delightful.
Add hot water and sip it slow,
Let it snow, let it snow, let it snow.
When you feel a chill or a "brrrrrr",
Use the peppermint stick to stir.
May it warm your spirit and your soul,
Let it snow, let it snow, let it snow!
Christmas Gift Thank You
Sometimes a Christmas gift is so special that a thank you note is necessary. Mark & I were fortunate enough to have received two such gifts this year. One from my mom and one from his mom. I created this card in duplicate for them.  I used paper from DCWV called Linen Closet. I love this selection of papers, they consists of creamy whites, soft teals and tans. There are also glitter papers. The embossed piece is white glitter paper, it is embossed with a Cuttlebug die. The teal crown circle is a Spellbinders die. The silver swirls are from a Sizzix die. It is a fun yet sophisticated look. I hope both of our moms know how much we appreciate them and there extra special gifts.

Tuesday, December 7, 2010
Tissue Box Cover
I have been making these covers this year. I have made several some of which I am very happy with. This one I made for my co-worker Marybeth and I think it turned out real cute. The stamp is a Crissy Armstrong called Very Present Helpers. I gave them the names Merry & Bright.
 I used my Copics to color them and a Martha Stewart paper punch to create the green decoration of the sides.


Sunday, September 12, 2010
MARYBETH B-DAY CARD
My CTMH scrapbooking club just used the Zippidee papers this month. I think they are perfect for this card and backpack idea. I wanted something fun, Marybeth's birthday falls on 9/11 and that can be a somber day. So I wanted my card to be lots of fun. In fact, the sentiment reads, "I made this card as young feeling as possible - 'cus who wants to feel old on their birthday!"
 I stuffed the backpack with chocolate. You have to see the back, because the straps really add to the authenticity of the backpack.


Finish up with a matching envelop and presto we are done, ready to give away. Happy Birthday Marybeth hope you enjoy it.
Monday, August 30, 2010
Cindy's Mini Baby Book
I created this mini album for my niece Cindy and her new baby due, Nov 2010. I am proud to report that all supplies I had on hand, with one exception the rings. Which is a long story, but surfice to say I now have 97 additional rings on hand, so I doubt that will ever be a problem again. The album came together in a weekend, I kept it simple.

The details...The covers are raw chip board, cut to 6 x 6.5, punched, and painted in pink. The paper background is white, embosed and rubbed with CTMH Baby Pink Ink, Three ribbons along the side, with a highchair charm added. One dollie, inked in the center, with pearls added, and a crochet flower. The bunny is from K&Co. sticker set.
 The inside pages I used various Sizzix die cuts, a few K&Co. stickers and the labels were printed using doodle bats. I used my LuminArte paints to get some shimmer on my flower die cuts. And some Distress Stickles for the lions mane. Under some of the photo mats I have a pull out sheet that mom and dad can add journaling.


The two strollers I created by using a 2" round scallop punch, cutting that in half and decorating, the wheels are 5/8" punch with brads.
 I'm quite pleased with the finished book, I hope Cindy enjoys filling it up with photos.

The details...The covers are raw chip board, cut to 6 x 6.5, punched, and painted in pink. The paper background is white, embosed and rubbed with CTMH Baby Pink Ink, Three ribbons along the side, with a highchair charm added. One dollie, inked in the center, with pearls added, and a crochet flower. The bunny is from K&Co. sticker set.

The two strollers I created by using a 2" round scallop punch, cutting that in half and decorating, the wheels are 5/8" punch with brads.

Sunday, August 15, 2010

Saturday, August 7, 2010
CAROLINE'S BRIDAL SHOWER
Well this isn't exactly the typical bridal shower card. But I was inspired by the color combination. So I went with it.
I used green as my card base, it is a 6x6 card. The DP is from American Crafts, I layered it with brown. The square in the middle is layered with brown and white. The felt flower is from Provo Craft. The brown ribbon is from my stash. I gathered it and glued it down, then I removed the thread so it would not show. The small white flowers at the bottom is ribbon. I also wrapped it around the center square. I cut flowers from the ribbon and used them as centers on the buttons. I used a Fiskars boarder bunch for the teal piece at the bottom.


I used green as my card base, it is a 6x6 card. The DP is from American Crafts, I layered it with brown. The square in the middle is layered with brown and white. The felt flower is from Provo Craft. The brown ribbon is from my stash. I gathered it and glued it down, then I removed the thread so it would not show. The small white flowers at the bottom is ribbon. I also wrapped it around the center square. I cut flowers from the ribbon and used them as centers on the buttons. I used a Fiskars boarder bunch for the teal piece at the bottom.

On the inside is the same DP again layered with brown. The sentiment is a stamp from my stash. I liked it offset because it shows off the DP.

Well that's it. I hope Caroline likes it.
Here is a side shot too.

Tuesday, August 3, 2010
TIM'S CARD
I made this card for my cousin Tim. He is dealing with some health issues and I wanted to let him know that I was thinking of him.
I used American Crafts for my DP. I really like the results. The ribbon and stamp are from my stash. Looks like I purchased the ribbon especially for this card.


I used American Crafts for my DP. I really like the results. The ribbon and stamp are from my stash. Looks like I purchased the ribbon especially for this card.

On the inside I decorated the left side with the same paper and another stamp from my collection.

Sometimes a project just goes together really easy. That was the case here, Yet I'm as pleased as if I spent hours putting it together.
Sunday, August 1, 2010
Anniversary Card for Patti & Ken

This card was made for friends Ken & Patti, they are celebrating their 40th Wedding Anniversary. What a wonderful accomplishment, congratulations.
My initial intention was to use a Magnolia stamp from the wedding collection, but alias it did not arrive in time, so instead I used my Cricut machine and the Paper Doll Dress Up cartridge to create the bride and groom figures. That took a considerable amount of close up work to get the clothes glued on. I cut the sentiment with the Beyond Birthday cart. My DP’s are from CTMH the “Veranda” collection. The flowers are Prima, topped with a brad from CTMH. The bird stamps are CTMH as well. The girl’s head decoration is done with Flower Soft. I used a Spellbinders die “Flourish” to emboss one of the mats and added Pearl Glimmer Mist for sparkle. A pre-cut piece of chipboard was used to mount the man and women on, I covered it with some of my DP using gel medium to affix it and as a top coat too. I sprayed the man and women with Super Seal to be sure the Flower Soft stayed put and for protection.

Unfortunately, the man and women fade into the background in the photo, but I didn’t make the card for the blog, in person it is very beautiful and I’m quite pleased with the result and hope they enjoy it too.
Tuesday, July 27, 2010
WEDDING CARD

This is a card I made for a couple's Wedding. I wanted a sophisticated, soft, simple look, I believe I achieved this. The colors I choose are very close to being mono-chromatic. The papers are from DCWV “The Luxury Stack”. I used an EK Success boarder bunch to create the bottom boarder and used the cut outs at the top of the card for decoration. The center of the card is a soft cream paper, which I scored at a 1/4" spacing. The medalion was created from a Cuttlebug die which I cut on my Sizzix. I added a stamped image of a flower and topped it all with a pearl. The cream paper is outlined with a simple white ribbon and the same ribbon used to create the bow. On the inside I bordered the top and bottom with the green DP and printed my sentiment on vellum paper. My only wish is that I didn't rush the photo, it doesn't have the best color to it, but I had to get the card in the mail. That's the really important part, right?
Subscribe to:
Posts (Atom)